Wednesday, March 31, 2010

quick update

We finally scored a Bumbo-chair. We wanted a green, orange or yellow one, but since we wanted it second hand we couldn't be too picky. Turquoise isn't too bad though. And pup likes it.

We've started to co-habit =)
I couldn't get this jacket around me in the end of the pregnancy, but now we both fit inside... hmm...

boing, boing, boing...
this is what pup does when mommy's sewing (when he's not screaming his head of in daddy's arms that is)
and speaking of sewing, here's a sneak-peak on th curtain I'll tutorial for you later. Here seen on the car-seat, on a seat with a smaller handle it would snap onto there as well (my Graco is too bulgy though)

Tuesday, March 30, 2010

sewing

I've actually been productive the last couple of days, patching one of pup's PJ's, re-sewing another, made a drool-bib and 2 pram-curtains (that will become a tutorial when all photos are taken)
That's about it for now.

Sunday, March 28, 2010

dancing =)

Last night I went out dancing. It was really fun, I've missed it.Picture is old, but yeah, I'm still dancing =)

Thursday, March 25, 2010

¤%&#ing internet...

It's decided to mess with my brain...
Every page I open choke up and hangs itself, it remains to see if I'll be allowed to post this.

My little pup loves the fly/bee/whatever winged creature it is that came with the Libero gift-bag after he was born. So far so good, but earlier years it was a flower, and I would want that one too =) And I found it on one of the web pages that decided to crash. Before I could even read their terms on purchases... *growl*This is what we have, though I've changed the huge plastic holder to a smaller metall one and hung it inside the "roof"

And below is what I want =)
Edit:: Picture removed due to lack of space

Sunday, March 21, 2010

turning over

Yesterday he turned over to his tummy and stayed there. Twice.
For a week or so he's been actively trying to turn over (so much funny stuff above ones head that needs investigation, and if not on ones back one might reach) and successfully done so, both knees touching, but then that treacherous arm under the belly kept flipping him back to square one.
The first time, he grabbed a hold of my hand and pulled himself to the side (this don't count as help since he can very well do that on his own). He then let go of me, but kept his arms up as he rolled on. Voile. Turned over without flipping back.
Second time was during diaper change, trying to avoid getting dressed I suspect... Or possibly aiming at the hamper since he got literally furious when he ended up face down on the floor. I just wanna add that we were on the floor to begin with =)

Saturday, March 20, 2010

The bottomless pit at lunch-time

First the most (failed) innocent face you've ever seen.

First you empty out mommy's boobies. Really drain them completely.
Then you eat your assigned portion of porridge (a table spoon or so)
More please?

You finish it of whit a few gulps of water (he is so good at drinking from the cup)
And for desert about 130ml of formula...
No wonder he's got chubby cheeks =)

Thursday, March 18, 2010

first taste of porridge

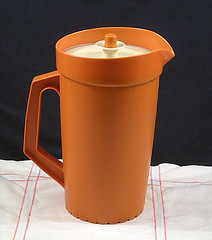
The Tupperware-party was successful, meaning I didn't buy myself silly. I ordered my little spatula and then a pitcher, because right now they had a capaign with those very same ones that I played with as a child, with a sealing lid. And I'm pondering if I should buy a water bottle as well. I only have crappy commercial ones, and the last one I used made the water taste like gasoline smells...

Yesterday I was putting pup down for a nap, and apparently I needed one myself. We slept like this for over two hours. No place to sleep like on top of mommy...
Today pup tried his first spoons of (semi) solid food. Oatmeal porridge (I had pulverized the grains) mixed with some formula. As seen, he was skeptical, but being the little bottomless pit of a stomach that he is, he denies nothing that looks like food.Hmm... This makes funny sounds when I smack my tongue
The night ended with a visit to grandma's, and well, puppy liked...
And we showed off the new shades. Julho Junior Looping size 3 =O that's age 2-4, chubby-head! Fair enough, they're a bit big, but size 2 was a perfect fit, and we need them to last the summer. Hopefully these will last this summer, the next and even the one following that.

Tuesday, March 16, 2010

Tupperware party tonight

This I found second hand for 4€ the other week. I remember how I ♥loved♥ to play with the miniature pitcher+mugs when I was a kid and couldn't resist these. My mom still use my old pitcher and it's working, sealing lid.We'll just have to see what I end up purchasing tonight, the plan is on a slim spatula...

Monday, March 15, 2010

Spring Sun

When the spring sun shines hard, protect you eyes and
WEAR SUNSHADES!!!!Pup's got that down, and he is puppy, puppy cool, my puppy, puppy cool...
At cousin A's birthday party, with great grandma and great raccoon-dog...
Köpmannamässan 2010
Merchant fairPup apparently enjoys people-watching and gnawing on "Stinky". After a while he got tired and the he slept and slept and slept....

Friday, March 12, 2010

wanna house-swap?

First out, what do you do when the pup is only happy in the bathtub and you need to get some sewing done?
Well, you place the sewing machine on the nursing table and do it while you keep an eye on the little splish-splash monster. Worked better than I expected, the sewing that is.

As for the view from our kitchen window...
I think it speaks for itself...
Anyone wanna trade home for a year or two?
Ours comes with BIG machines...
We've begun baby-swimming. Here's father and son posing afterwards.
All the other babies were a bit spooked by all the water and laid (fairly) still on their backs when it came to that. Not our pup. He was splishing and splashing, squirming like a worm and did his best to drink the pool water...

Wednesday, March 10, 2010

bathtime

I don't understand why blogger keeps flipping some of my images, it's very annoying.


Pup enjoys his bathtub, and his water toys. And to splish splash with the water...

Saturday, March 06, 2010

How to make a nightsack from a t-shirt

Hur man gör en sovpåse av en gammal t-shirt.

1
You need a t-shirt which is approximately 80cm long to make a nightsack for a 3-6 month old baby (my pup is size 62 right now) so that there is room to grow, and a pair of wide overalls.

Du behöver en t-shirt som är ca 80cm lång för att göra en sovpåse som passar en 3-6 månaders baby (min har stl 62 nu) då det ska finnas rum att växa, samt ett par vida hängselbyxor eller en lös overall.
2
Cut about 1,5 cm from the pants to have room with seams. Make sure to NOT make the end of the arms too tight (it happens so easily) and don't bother with them being too long, just fold them up when the baby wears the nightsack and it maximizes the time of use.
When at the widest point of the overalls, draw a line to the edge of the t-shirt and cut to there.

Klipp ca 1,5 cm från byxorna för sömnsmån. Se till att INTE göra ärmslutet för tight (det händer väldigt lätt) och strunta i om ärmarna är för långa, vik istället upp dem när bebisen använder sovpåsen så maximerars användingstiden.
När du kommit till det vidaste stället på byxorna, dra en linje till bortre änden på t-shirten och klipp efter den.
If you're making more than one nightsack, just use the first one as pattern for the next ones.
Om du gör fler sovpåsar, använd den första som mönster till de andra.3
Use the scrap fabric from the sleeves to close up the neckline so it's snug enough for a baby. There are a few choices, and is the only part of the nightsack that can be considered tricky.
You can make a flap that closes with buttons, overlapping or with just buttons, it all depends on the neckline and how it's shaped. I'm sure there are more ways, but I used these.

Använd resterna från ärmen till att minska av halshålet så att det passar rund en bebishals. Detta är det enda som är lite knepigt med denna sovpåsen, och det finns några olika sätt. Du kan göra en flik som stängs med knappar, en omlottöppning eller bara sätta dit knappar, det beror helt på hur halshålet är format. Det finns säkert flera sätt, men dessa använde jag.3.5
Overlapping neckline. Use both sleeves, pin them from back to front. Flip over to the backside and cut away scrap fabrick about 1 cm under where you'll attach the overlap. Mark where the ends (4 needles total) are and take off the overlap. Sig-sag close to the edge, then pin it back to the same place in the neckline, guided by the needles you left, and sew in one of the previous seams for invisibility.

Omlott halshål. Använd båda ärmar, nåla fast dem bakifrån och fram. Vänd över till avigsidan och klipp bort överlopps tyg ca 1 cm från där du kommer sy fast omlotts delen. Markera ändarna (4 nålar totalt) och ta sedan bort omlott delen. Sick.sacka nära kanten, sen nålar du tillbaka den på samma ställe igen, med hjälp av nålarna du lämnat. Sy i en av de tidigare sömmarna så syns det knappt.3.75
Or just can everything after pinning the first time and sig-sag straight away. That will be a bit tricky since there will be a lot more fabric to keep track of and a lot more needles, but instead it's quicker. Just sew and then cut away the scraps. If you want to you place a straight seam just to finish it.

Eller så struntar du i allt efter första nålningen och sick-sackar direkt. Det är lite knepigare eftersom det blir mycket mer tyg att hålla koll på och mycket mer nålar, men istället går det snabbare. Bara sy och klippa bort överlopps tyg. Om du vill kan du lägga en raksöm för att avsluta.This is the difference between the two techniques
Så här ser skillnaden ut på de två teknikerna.4
Thread an elastic band through the perfect canal created by the old hem. It should be long enough to fit around your baby's tummy without being too tight (for diaper-changing). Pin it down.

Trä gummiband genom den perfekta kanalen som den öppna fållen utgör. Den behöver vara tillräckligt lång för att passa runt bebisens magen utan att bli för tight (vid blöjbyten). Nåla fast.5
Start sewing from the sleeve so that the old sleeve-seams match up. Sew 1-1,5 cm from the edge. If you do a 90° turn where sleeve and body meet, take back once to make it a bit stronger. You can also round the armpit.

Börja sy från ärmen så att de gamla ärm-sömmarna passar ihop. Sy 1-1,5 cm från kanten. Om du gör en 90° sväng där ärm och kjol möts, ta tillbaka en gång så det blir lite starkare. Du kan även runda armhålan.
6
Sig-sag between the seam and the edge, go back and forth a few times over the elastic band so it's secure. Cut away spare fabric close to the sig-sag seam if you're ambitious (I wasn't)

Sick-sacka mellan sömmen och kanten, ta fram och tillbaka några gånger över gummibandet så det sitter säckert. Klipp bort rest-tyg nära sick-sack sömmen om du känner för det (det gjorde inte jag)
7
Turn everything the right way. Mark up for 3 or 4 press-buttons. I made a seam for every one, but that's optional. Hammer in the buttons through the elastic band so it keeps evenly dispersed and to prevent it from twisting.

Vänd allting rätt. markera för 3 eller 4 tryckknappar. Jag sydde en söm vid varje markering, men det gör man som man vill. Slå i knapparna genom gummibandet så hålls det jämnt fördelat samt vrider sig inte.All done...
Färdigt...

Thursday, March 04, 2010

How to make a scud-holder, I mean pacifier-holder

Hur man gör en napphållare:

1
You need something to attach it to the child's clothes, this particular clip came with some reflector-tags I bought, and band. I've used that kind that comes with clothes to attach them to the hanger (I can't stand them and cut them off as soon as I get home)

Du behöver något att fästa i barnets kläder, denna kommer från en reflex-förpackning från början, samt band. Jag har använt dem som är på kläder för att hålla dem på galgen (jag avskyr dem och klipper bort dem så fort som jag kommer hem)

2
Attach the band to the clip, I did it by hand, be impressed. Then make a loop at the bottom, just big enough to let the clip pass through (this one is extra big just to show) and sew it together. Fraying is best prevented by double-folding the band before stitching it down. Also, make sure that the finished band, from clip to end of loop, is not too long, that can be dangerous for the baby. I've made mine about 15 cm, after measuring the ones I've bought in the store.

Fäst bandet vid klämman, jag sydde för hand, vilket förvånade till och med mig själv. Sen gör du en ögla i andra ändan på bandet, bara tillräckligt stor för klämman att passera igenom (denna är extra stor för att det ska synnas) och syr fast den med. Bästa sättet att förhindra fransning är att dubbelvika ändarna innan man syr fast. Dessutom, försäkra dig om att det färdiga bandet, från kläm-fästet till slutet på öglan, inte är för långt, det kan vara farligt för barnet. Jag har gjort mina ca 15 cm efter att ha mätt de jag köpt i butiken.

3
Thread the loop through either the ring or the ventilation holes of the pacifier, then thread the clip through the loop and tighten. Attach the clip to the baby's clothing and you're good to go.

Trä öglan genom antingen ringen eller ventilationshålen på nappen, trä sedan klämman genom öglan och spänn åt. Fäst klämman i barnets kläder och du är färdig.


I promised you pictures of the hammock, and here it is.

All you do is thread it through the bars until you're at the middle and make a knot. Then you stretch it diagonally across the bed and tie it there with another knot. For safety, tie the loose ends in yet another knot around the corner bar. You might have to redo this once you've tried it with the baby inside, the knot usually isn't as tight as one believes, giving that the bottom touches the mattress, unless you have the floor of the bed lower down of course.

My pup was very happy and slept really good coverd in his puke-rag and his bunny, this wrap don't leave much room for a blanket or anything, but he didn't seem cold at all when I picked him up.
I advice you to stop using a hammock once the baby starts to try and get out of it on his/her own. And to have it as close to the bottom of the bed as possible just for safety. This one do not tip over willingly I noticed when trying to grab pup while still laying in my bed (orange sheet) and that's comforting. It swings really well too.

Wednesday, March 03, 2010

from wrap to a hammock

I forgot, I've been up to one more thing today (yeah, yeah, I know, get back to the sewing...) and that was tying one of the baby-wraps we have as a hammock in the crib. I'll post pictures when I empty the camera.

I was inspired by this hammock that's for sale in basically every online store around here
This is the same kind of wrap we have, but ours is more of green, aqua and purple


Me Wants!!!
It's a dragon... and a very very cute one at that...

sewing... ish...

pictures will come later, I'm not yet done with the camera.

I've begun sewing the nightgowns, sooo demanding, 2 side seams a piece, but the tricky part is the neck, how to make it big enough for the head but still snug enough to be warm, without cutting the shirts to pieces.

But I've done 2 scud-holders, will make a tutorial on that I think =)
Simplest design ever, though it only works on pacifiers with a ring or ventilation holes in the shield. I will have pictures in the tutorial.

Tuesday, March 02, 2010

a year ago...

I'm a week of, it turns out, but hey, the bliss lasted.
February 24th, early in the morning I tested positive on a Clear Blue test.
I just had to go back and read the mail communications from back then between me and Misty. Too bad so much happened in the FB chat and MSN so there's no record for it.

Here's the first hysterical mail:
*cyber crying while mentally hugging Misty tight*
You truly are an angel! (you sure you're not a dragon, their blessings tend to come true too)
It was no shadow today! I can't wipe the silly smile off of my face (and I don't want to either)
am at work, I'll gush with you later... can't post more, people coming...


Today I've begun making more sleeping gowns for pup, that close in the hem with buttons. He loves the two he has, kicking his bare feet inside them. And since no-one sells PJ's that are up to my standards, aka: feet and buttons down in both legs, sewing is the best solution. Pictures will come another day.